Recipe: Banana Muffins in Airfryer

Finally a baked goods recipe that I’m happy with!

There’s SOMETHING about baking that I could NEVER get right. I blame it on… well, non-hereditary non-talent. My mother and sister bake delicious treats; wait a minute, I didn’t inherit that bit!

Cooking is forgiving. Missed out an ingredient? Don’t worry, there’s always something else to make up for it. So easy to fake it like a pro, bro!

But baking! It’s like thermodynamics to someone who doesn’t know what thermodynamics means, yet uses it as an example in a baking-related context! The nerve of these plebeians…!

But yes, baking. There are strict rules and principles to follow, which do not bode well for a person who cannot follow instructions, i.e. me.

Still I tried and tried. Failure played in my mind like a lingering bad dream (and a boy named xxx). Obsessed? Me? Never! 😛

I just want to BE ABLE to bake SOMETHING that I would eat.

… and I finally did.

Banana Muffin baked in air fryer

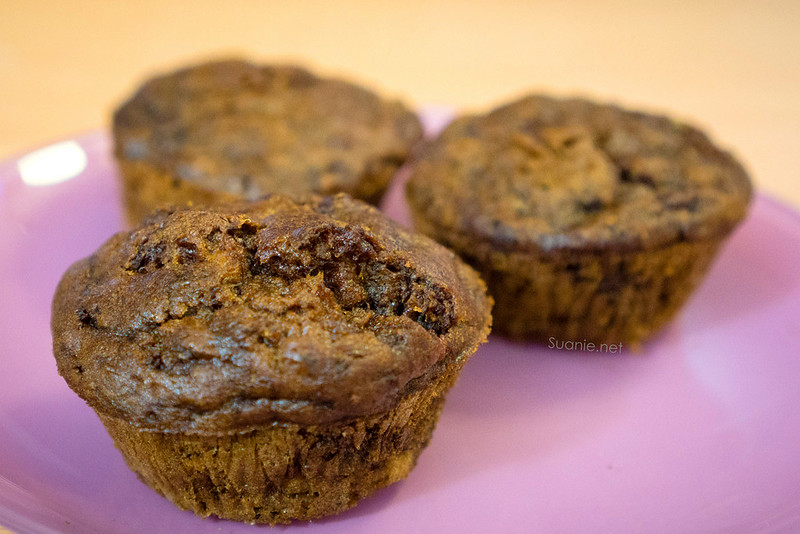
This Banana Muffin recipe contains 2 eggs, NO oil and NO butter. This results in an old-fashioned dense muffin, NOT light nor fluffy. Almost like a heavy quick bread type. Rich, filling, moist, slightly chewy and not too sweet. This recipe makes 12 large muffins.

Wet Mix
4 ripe bananas (Cavendish size)
2 eggs
90g brown sugar (100g for white sugar)
1 tsp vanilla essence
3 tbsp milk (can substitute with unsweetened applesauce)
1 spoonful Nutella (optional)

Dry Mix
250g flour (whole wheat or plain)
1 tsp salt
1 tsp baking soda
1 tsp baking powder
1 tsp cinnamon
2 tbsp cocoa powder (optional)

Optional
1 handful chopped walnuts
Chocolate sprinkles
Dried fruits

Banana Bread Muffin - ripe bananas, eggs

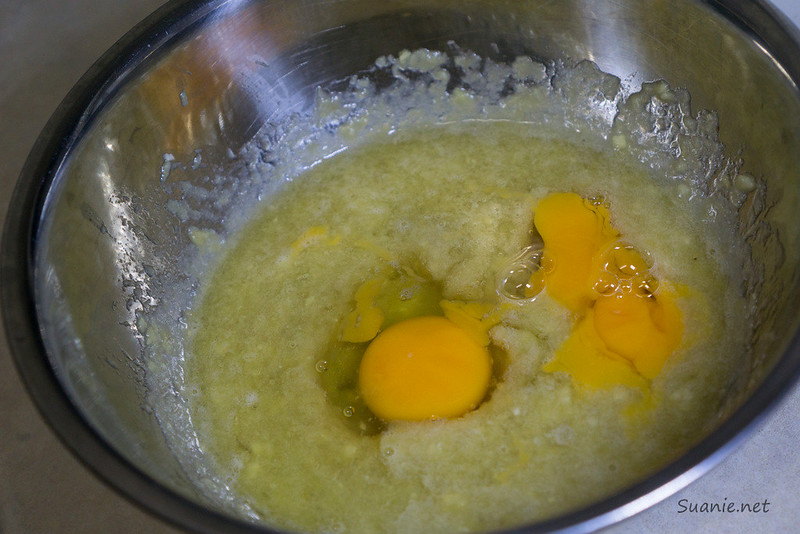
1) Mash ripe bananas in a bowl, then add the rest of “Wet Mix”. Combine well.

Banana Bread Muffin - flour mix

2) Sift “Dry Mix” then add to “Wet Mix”. Gently fold to combine, but do not stir vigorously.

Banana Bread Muffin - walnuts

3) Add in any optional chopped walnuts, dried fruits or chocolate sprinkles. Chocolate sprinkles should be in EVERYTHING.

Banana Bread Muffin - cake mixture

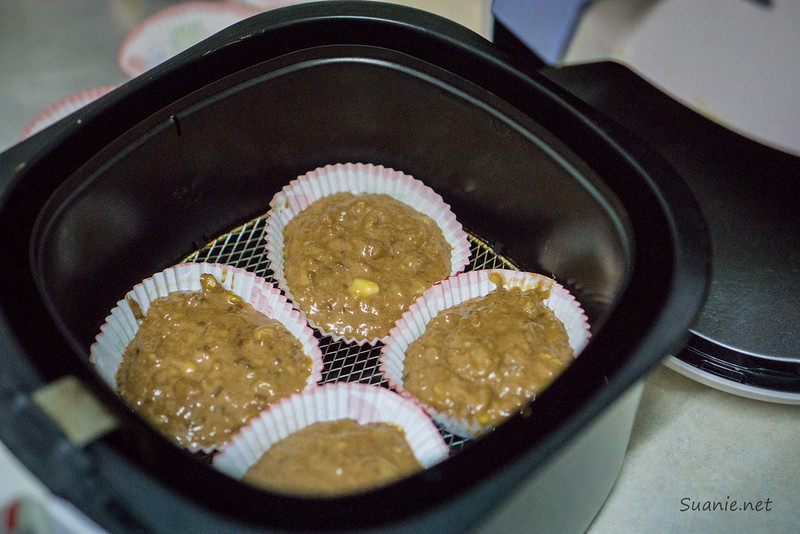
4) If oven, pre-heat to 175°C. If airfryer, pre-heat to 120°C.

Pour in batter to muffin cups. Bake in oven for 20-25mins, and in air-fryer for 30mins, or until a toothpick inserted in the middle of the muffin comes out clean.

Banana Bread Muffin - airfryer

5) Get excited because you just made delicious muffins!

Moist Banana Muffin baked in air fryer

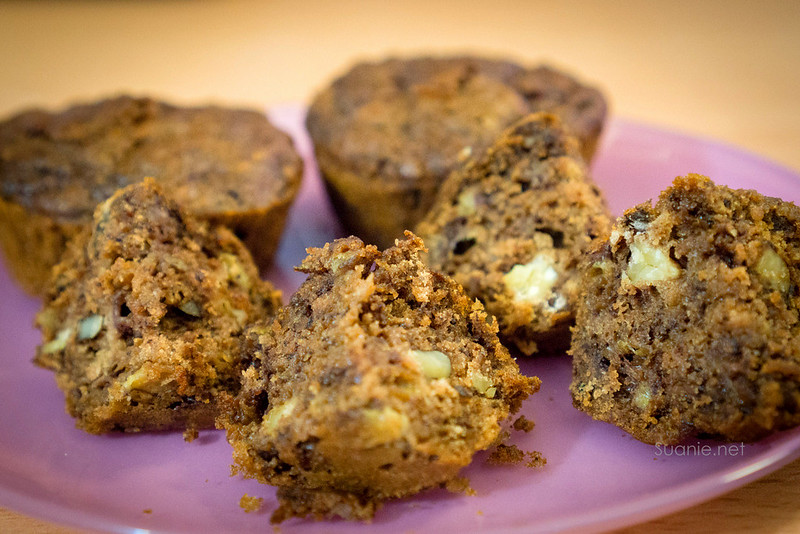
Yes I don’t make beautiful muffins, but they sure tasted great! Now that I successfully made this, I can retire my baking ambitions.

Recipe: Salted Vegetable and Tofu Soup

One of my favourite soups is also the easiest and fastest to cook. It takes just one hour and 6 ingredients to make a large pot of delicious Salted Vegetable and Tofu Soup.

Chinese salted vegetable and tofu soup - bowl

The only hazard in making this soup is, uh… To cut a long, sad story short, I do not recommend slicing slippery salted vegetables with a sharp Zwilling knife when you’re in a hurry. Not if you like all your fingernails intact 😛

… that’s it. There are no other stories related to this Chinese pot of deliciousness. It’s bursting with simmered bone broth goodness, marked with a satisfying saltiness that pairs great with soft tofu.

Also, the ability to whip up such simple home-cooking makes you look like a kitchen goddess because it reminds people of family. True story.

AND being thought of as a goddess of any kind is one of the most absurd, yet strangely appealing feelings ever. You should try it once in a while.

So make this soup already!

… Wait wait, a few more notes to share:

… On the bones, use chicken if you can’t or don’t like pork.
… On salted vegetables, it’s pickled/salted mustard greens that looks like this *click*. Wet markets will have them, some hypermarkets may not carry them. There are many kinds of salted vegetables, remember it’s the “wet” one.
… On tofu, use firm or pressed tofu. Eat tofu, it’s good for you!
… On ginger: I buy a big one, slice it up and freeze the rest. I don’t use ginger all the time, and it is wasteful to buy when you only need a little.

Frozen ginger slices
Frozen ginger slices at my convenience!

Okay, NOW let’s get to it:

Chinese salted vegetable and tofu soup - method

1) Blanch 300g pork/chicken bones in a pot of boiling water. This removes the scum.

2) Remove and transfer to another pot of water with a couple ginger slices. Let it come to a boil, then simmer for 30 – 40 minutes.

3) Use this time to slice up a packet of salted vegetables (cut it however you like to eat it), 2 tomatoes and a box of tofu. Personally I like everything bite-size. Watch out for your fingernails.

4) Put in salted vege and tomatoes to cook for 10 mins. If you want a saltier taste, this is when you put in a pickled plum. I find it unnecessary.

5) In the last 5 mins, put in tofu and let it simmer before serving. If you’re using prawns and/or meat slices, this is the time to put it in.

Chinese salted vegetable, tomato and tofu soup

Ta-dah, a nice bowl of Chinese soup ready to be consumed, nom nom nom nom… Go on, make soup and let your domestic goddess shineeeeeeee!

(Ingredients and method all above. I’ll update again with Printable Recipe when the plugin decides to work again)

Recipe: No-Cream Carbonara in 30 minutes

You know those link baiting headlines screaming “97 things you must know/cook/travel before you’re 20/30/dead”?

I hate them! They make me feel so bad about myself!!
(maybe ‘cos I’m so behind their unrealistic curve 🙁 )

But.. BUT! I can make a 4-ingredient no-cream pasta carbonara in less than 30mins! This!

No-Cream Carbonara in less than 30 minutes

And I’m telling you, SO CAN YOU! That’s how the Italians do it: eggs + cheese + bacon + black pepper. If you choose to drown in carbs, might as well go authentic!

For this recipe, I put garlic and onion for added fantasticness. I find the original 4-ingredient recipe boring (sorry, Italians); the extra bits kicked it to greater heights.

Ready? Let’s go! Full recipe at the end of the post.

First, cook the pasta. Boil some water, add some salt, then throw in enough pasta for 2. While it’s cooking, do all these:

No-Cream Carbonara - ingredients

I recently discovered the joy of chopping onions without bawling my eyes out as if my pet cat died. It took me a long time to find out that the sharper the knife, the less you cry. There must be a stream of logic that the smart people can explain to you.

Also if pork is off limits to you, substitute with fine quality beef bacon. Or Chinese ham. Or chicken ham (then add salt). The point is, something fatty and salty.

Heat up the oil in a pan. Cook bacon until slightly crispy, then add onion and garlic if you wanna.

No-Cream Carbonara - pan fry

Once the pasta is cooked, drain well then put into the pan, mix well with the bacon + onion + garlic.

Turn off the fire, carefully add the mixed egg + cheese + black pepper. Mix well, keep, turning it around, make sure the pasta is evenly coated.

No-Cream Carbonara - add pasta

Serve to self and appreciative partner/ friend. Add more black pepper if you like.

Then workout like hell ‘cos you just ate enough calories to feed [insert name of starving village here].

Enjois.

Recipe: No-Cream Carbonara in 30 minutes

Total Time: 30 minutes

Serves: 2

Recipe: No-Cream Carbonara in 30 minutes

Ingredients

3 - 4 bacon, sliced thinly
1/2 onion, chopped
3 - 5 cloves garlic, chopped
2 eggs
50g Parmesan cheese, grated
Black pepper to taste
Olive oil for cooking
Pasta for 2, your preference

Instructions

  1. Cook pasta according to instructions on packet.
  2. While pasta is cooking, chop/ slice garlic, onion and bacon.
  3. In a bowl, add eggs, cheese and black pepper. Whisk lightly, mix well.
  4. Heat up oil in pan, cook bacon till nearly crispy, then add onion and garlic.
  5. When pasta is cooked, drain well and add to pan. Mix well with bacon etc.
  6. Turn off fire/ heat, remove from stove if necessary. Add egg mixture into pan. Coat pasta evenly, keep stirring and mix well.
  7. Serve with black pepper, cheese, pride and happiness.
http://www.suanie.net/2014/09/recipe-no-cream-carbonara-in-30-minutes/

Recipe: Roasted Red Pepper Pasta Sauce

I LOVE roasted red peppers. They are sweet, juicy, smoky and flavourful. I eat them in wraps or sandwiched between thick slices of bread (tip: add hummus), or as a side dish for non-Asian cooking, or on its own because they are just so good and I can’t stop myself!

I saw a recipe for roasted red pepper pasta sauce and gave it a shot. The original recipe called for 4 tablespoons of butter but no no, I nixed that. Nobody is allowed 4 tablespoons of butter in pasta sauce, nobody!

This is a good change from the usual tomato or cream-based pasta sauces. Let’s go!

Roasted Red Pepper Pasta Sauce - prep

Full list of ingredients at the bottom of this post.

I’ve long acquired the kungfu to roast peppers by myself. It’s cheaper and immensely satisfying than buying ready-roasted ones from the shops. Here’s how to roast peppers in your oven *click*. No oven? No problem! Here’s how to roast peppers on your gas stove *click*.

First you need the roasted peppers sliced into strips. Lightly toast your pine nuts; they burn easily so keep an eye on this one. It’s about 2 tbsp worth of pine nuts in the photo, you only need 1 tsp. Saute garlic and onion for a couple of minutes.

Roasted Red Pepper Pasta Sauce - meat and butter

Can’t live without meat? Cook up some ground meat in butter, set aside. I use chorizo because it comes ready with salt and spices. Kinda defeats the healthy living part so skip this if you wanna.

Roasted Red Pepper Pasta Sauce - blender

Put the roasted red peppers, onion, garlic, pine nuts and sweet basil in the blender. Blend blend blend!

Roasted Red Pepper Pasta Sauce - blended sauce

Nyam. Pour content back into pan (with meat if you have it) to cook. Add cream and butter. Add salt and pepper to taste.

Roasted Red Pepper Pasta Sauce - cream

Simmer for 5 minutes.

Roasted Red Pepper Pasta Sauce - cook sauce

Serve with cooked pasta, your preferred cheese, bits of sweet basil and a whole lotta love.

Roasted Red Pepper Pasta Sauce

If you’re not a pasta person, pour it over your meat or spread on your bread. I know that sounds dirty so make sure that you clean up after.

As this Malaysian would say, enjois!

Notes: This recipe’s sauce isn’t very clingy, if you know what I mean. To add richness and clingy-ness, add butter and/or use heavy cream instead of normal cooking cream. But it’s okay not to be so clingy, a major rule in life. If you want a nuttier taste, the max I recommend is 1.5 tsp pine nuts. Anything beyond that is too nutty for anyone’s liking, uewekkk… If you don’t have pine nuts, GO OUT AND BUY IT; store in your fridge for added awesomeness to your salads and pastas. Sweet basil isn’t the same as Thai basil.

Recipe: Roasted Red Pepper Pasta Sauce

Recipe: Roasted Red Pepper Pasta Sauce

Ingredients

4 roasted red bell peppers, sliced
1 onion, chopped
3 garlic cloves, chopped
1 tsp pine nuts, lightly toasted
150ml cream (cooking or heavy)
a bunch of sweet basil leaves
1 tbsp cooking oil
Salt + Pepper to taste
Optional:
1 tbsp butter
200g ground meat
Shaved parmesan or mozzarella

Instructions

  1. Heat up oil in pan. Saute onions and garlic until soft.
  2. Remove, cook meat in butter for a few minutes (optional).
  3. Blend: roasted red peppers, pine nuts, onion, garlic, sweet basil leaves
  4. Put blended content (and meat, if you have it) back in heated pan.
  5. Add cream and butter, simmer for 5 minutes.
  6. Add salt and pepper to taste.
  7. Serve with cooked pasta or meat, your preferred cheese, sweet basil leaves and George Clooney.
http://www.suanie.net/2014/03/recipe-roasted-red-pepper-pasta-sauce/

Basic stock recipe: Ikan Bilis (dried anchovies) stock

The humble ikan bilis (dried anchovies) soup is something that ties me close to home. It’s the most simple, basic of all soup stocks and remarkably easy to make. We use it for just about any soupy meals. Think fish ball soup, rice vermicelli (bihun) soup, mee hun kueh (known in KL as pan mee, mit), steamboat, spinach and preserved egg soup …

It’s probably the first thing you should learn how to make after you moved out from your parents’ house.

If you have need for ikan bilis stock, you should really make it from scratch. It takes only 40 minutes and the best part is, you know exactly what goes into it.

The good thing about making your own stock is that you can make a huge batch, then keep it in the fridge over the next few days. If you’re planning on further use, freeze it and use within 3 months.

This recipe makes about 2.2 litres worth of ikan bilis stock.

Ikan bilis (dried anchovies) stock - a handful

What kind of ikan bilis should you get? Not the expensive types please, those are for eating. The ‘Grade B’ type should suffice, but be sure to remove the head and insides, else the soup will be too bitter.

Ikan bilis (dried anchovies) stock - wash

Wash the ikan bilis under running water, twice. Drain and set aside.

Ikan bilis (dried anchovies) stock - garlic ginger

Take 3 garlic cloves, remove skin and give it a slight squash with your chopper. Use 2 slices of ginger – but if you’re using Bentong ginger (really strong), maybe 1 slice should be enough. If you like your soup slightly spicier (more ginger-ish), use 3. But no more than that as the ginger taste will be overwhelming!

Ikan bilis (dried anchovies) stock - simmer strain

In a pot, pour in 2.5 litres water. Bring to a boil, then add ikan bilis, ginger and garlic. Let it simmer on medium-low fire for 30 mins.

When it’s ready, remove everything in the stock, save for the stock (har har). Remove any impurities with a sieve.

You now have ikan bilis stock, wahey! Rejoice, world!
p/s: Thanks Mom for the recipe! <3

What to do with ikan bilis/dried anchovies stock

# Add noodles/ rice vermicelli + fish balls + leafy greens = meal.
# Use it as your steamboat/hotpot soup base.
# Add spinach + sliced century egg + Chinese wolfberries = soup.
# Add fish ball + leafy greens + thin carrot strips = fish ball soup.
# Use it as base soup for mee hun kueh
# Cook porridge in it = brings your porridge to the next level.

Endless possibilities 🙂

How to roast peppers in the oven

Roasted peppers are versatile for just about any recipes that need a dash of awesomeness. If you’re roasting one or two bell peppers for a quick fix, it’s easy enough to do it on a gas stove.

If you’re looking to roast a bunch at once, the oven’s the best way to go.

Roasted pepper - oven style

1) Preheat your oven to 180°C (160°C with fan) for 10 mins using the ‘grill’ or ‘top heat’ setting.
2) Clean the peppers: wash and dry, slice into half, remove stems and seeds.
3) Line a roasting pan with aluminum foil. Lay the peppers, top up.
4) Put into oven for 30 minutes. In the meantime, go dance around the house.
5) If you like your pepper skins to be blacker (sweeter), add 5-10 mins to it. Otherwise they’re good to be removed from the oven.
6) Remove the peppers from pan and into a ziplock bag.

Roasted Pepper - in the bag

7) Zip the bag, let the peppers steam inside for about 10-15 mins.
8) Then it’s time to remove the juicy suckers, ready for some skin peeling!

Roasted pepper - peeling skin

By this time, it’s quite easy to peel off the entire skin from the flesh. Just be careful as it’s still hot and might burn your fingers. But bear with it, it will be slippery but DO NOT wash it with water as it will ruin the sweet, juicy flavours. And waste all your effort not to mention electricity for the oven.

When you’re done, slice them up, let them cool then store in fridge! Unless you’re planning to use them immediately…

Freshly roasted bell pepper

.. like sandwiched in tortilla wrap with hummus, tuna meat and fresh lettuce.

Roasted pepper - hummus wrap

Sometimes life doesn’t get any better than that 🙂

Make your own 5-minute chocolate Nutella mug cake!

Tough day? Tough week? Tough decade? Need instant pick-me-up sans implied sleaziness? Need something you could make with your own hands to provide a sense of accomplishment without tearing down the kitchen? Need self-gratification in form of gluttony decadence?

You need a 5-minute chocolate Nutella mug cake. With just 5 minutes and some basic ingredients, you could potentially save yourself from total embarrassment or ruin because… well how many emotionally-distraught people can think straight?

Cake will save them. And you.

5 minute chocolate nutella mug cake - ingredients
Every household should have Nutella at all times

You need:

– 1 egg
– 1 tbsp sugar
– 1 tbsp cocoa powder
– 3 tbsp oil
– 2 tbsp Nutella
– 3 tbsp flour
– 3 tbsp milk
– 1/4 tsp baking powder
– a slight pinch of salt
– 2 drops of vanilla essence (optional)

Mix everything together in a nice big mug. Mix hard and well. That means everything must be a nice smooth liquid, no lumpy bits to be found. This takes me a couple minutes because I stir the s- out of the mix.

5 minute chocolate nutella mug cake - in microwave

Pop the mug into the microwave on high for 2 minutes. Stick around and watch the cake mixture rise.

5 minute chocolate nutella mug cake - baked

And it’s ready! Eat by itself or with cold creamy vanilla ice-cream.

5 minute chocolate nutella mug cake

You may now feel like the most accomplished person in the world… till the end of cake.

You’re welcome.